It should be fast enough to where the Orb spawns below the Magnes Pin, so you can grab it while Magentized then launch yourself to the exit
Next two rooms you want to damage boost off of the Spear Guards and Skeleton Archers
Important to note for the Spear Guards is that sometimes they can thrust their Spears up, causing heavy knockback if it hits you
To avoid this, slow down your backdashes as you approach them then jump over and get hit like normal
Also, usually an Evil Force (Giant Head) spawns, which is a useful damage boost as it flies low to the ground, so you can just shorthop into it without turning around for i-frames
In the following rooms, backdash jump up any stairs, slide through the enemies in the inner hallways, and backdash/slide off any ledeges in descending rooms
There's a Skeleton Archer in the first descending room. If you hear it drawing its bow, wait on the raised platform, otherwise keep going
Middle
Damage boost off the Spear Guard through the Invisible Man Ignore the HP Max Up and damage boost off of the Archers in the Guillotine Room to get to Albus
In the Albus Room, backdash to the second to last tile on the ground, then absorb the glyph don't go too far or you trigger some text
Backdash out of that room and through the first Iron Maiden, sliding under the second one before grabbing the Money at the end
Ascend, and in the next room, damage boost off the Invisible Man to backdash through the Creature
Use jump attacks as you ascend with Macir to one shot the Skeleton Archers in the following room
Slide through the Spear Guard, grab the Heart Max Up to the left of the Magnes Pin then use the same pin to launch yourself into the next hallway
From there, continue sliding through enemies until you leave the insides of the Prison
End
In the second to last room with the demons, trigger the Spotlight
Once the Tinman is on screen, hit it with One Macir Union and a Single Jump Attack or Slide into it
Open the Blue Chest for Strength Ring and dash towards the exit
Open the Yellow Chest for Glyph Sleeve, and if you don't get the Text Skip, it's not a huge deal but definitely learn it
I wanted to isolate the Tinman segment so it's easier to reference:
First Boss Rush Segment
Pre-Boss Rush
This part is a bit complex, so definitely watch the videos alongside reading this for more clarity
After exiting the Prison, return to the Village and buy the Maximum Amount of Tickets then use the rest on Meat
Fully refresh your hearts, save and use the DC Menu to reset the game
Go to Course 1, on one sleeve, equip Double Confedere and Magnes
On the second sleeve, equip Double Dominus Hatred and Magnes
Finally, equip Strength Ring
Go through the portal
Arthroverta
Use Hatred Twice then a Puff Union
Backdash into the portal
Crab
Unfortunately, we can't use Crab Skip here, so we got a boring fight ahead
Get to the top, and stay on the bottom left platform at the top, you won't get hit by Crab's ascent here
Just spam Regular Macir Attacks, we do enough damage to instant phase transition with normal attacks
In Red Phase, I recommend hugging the right wall to force it to hit the same ceiling spot 3 times
After the crack, hit the claw as much as you can
Repeat this twice, and make sure it targets the pre-existing cracks in the ceiling like normal
After the third ceiling break, you can either take damage to go through claw and launch up to the elevator
or do Claw Skip
Make sure you hit down on the Elevator on the right side
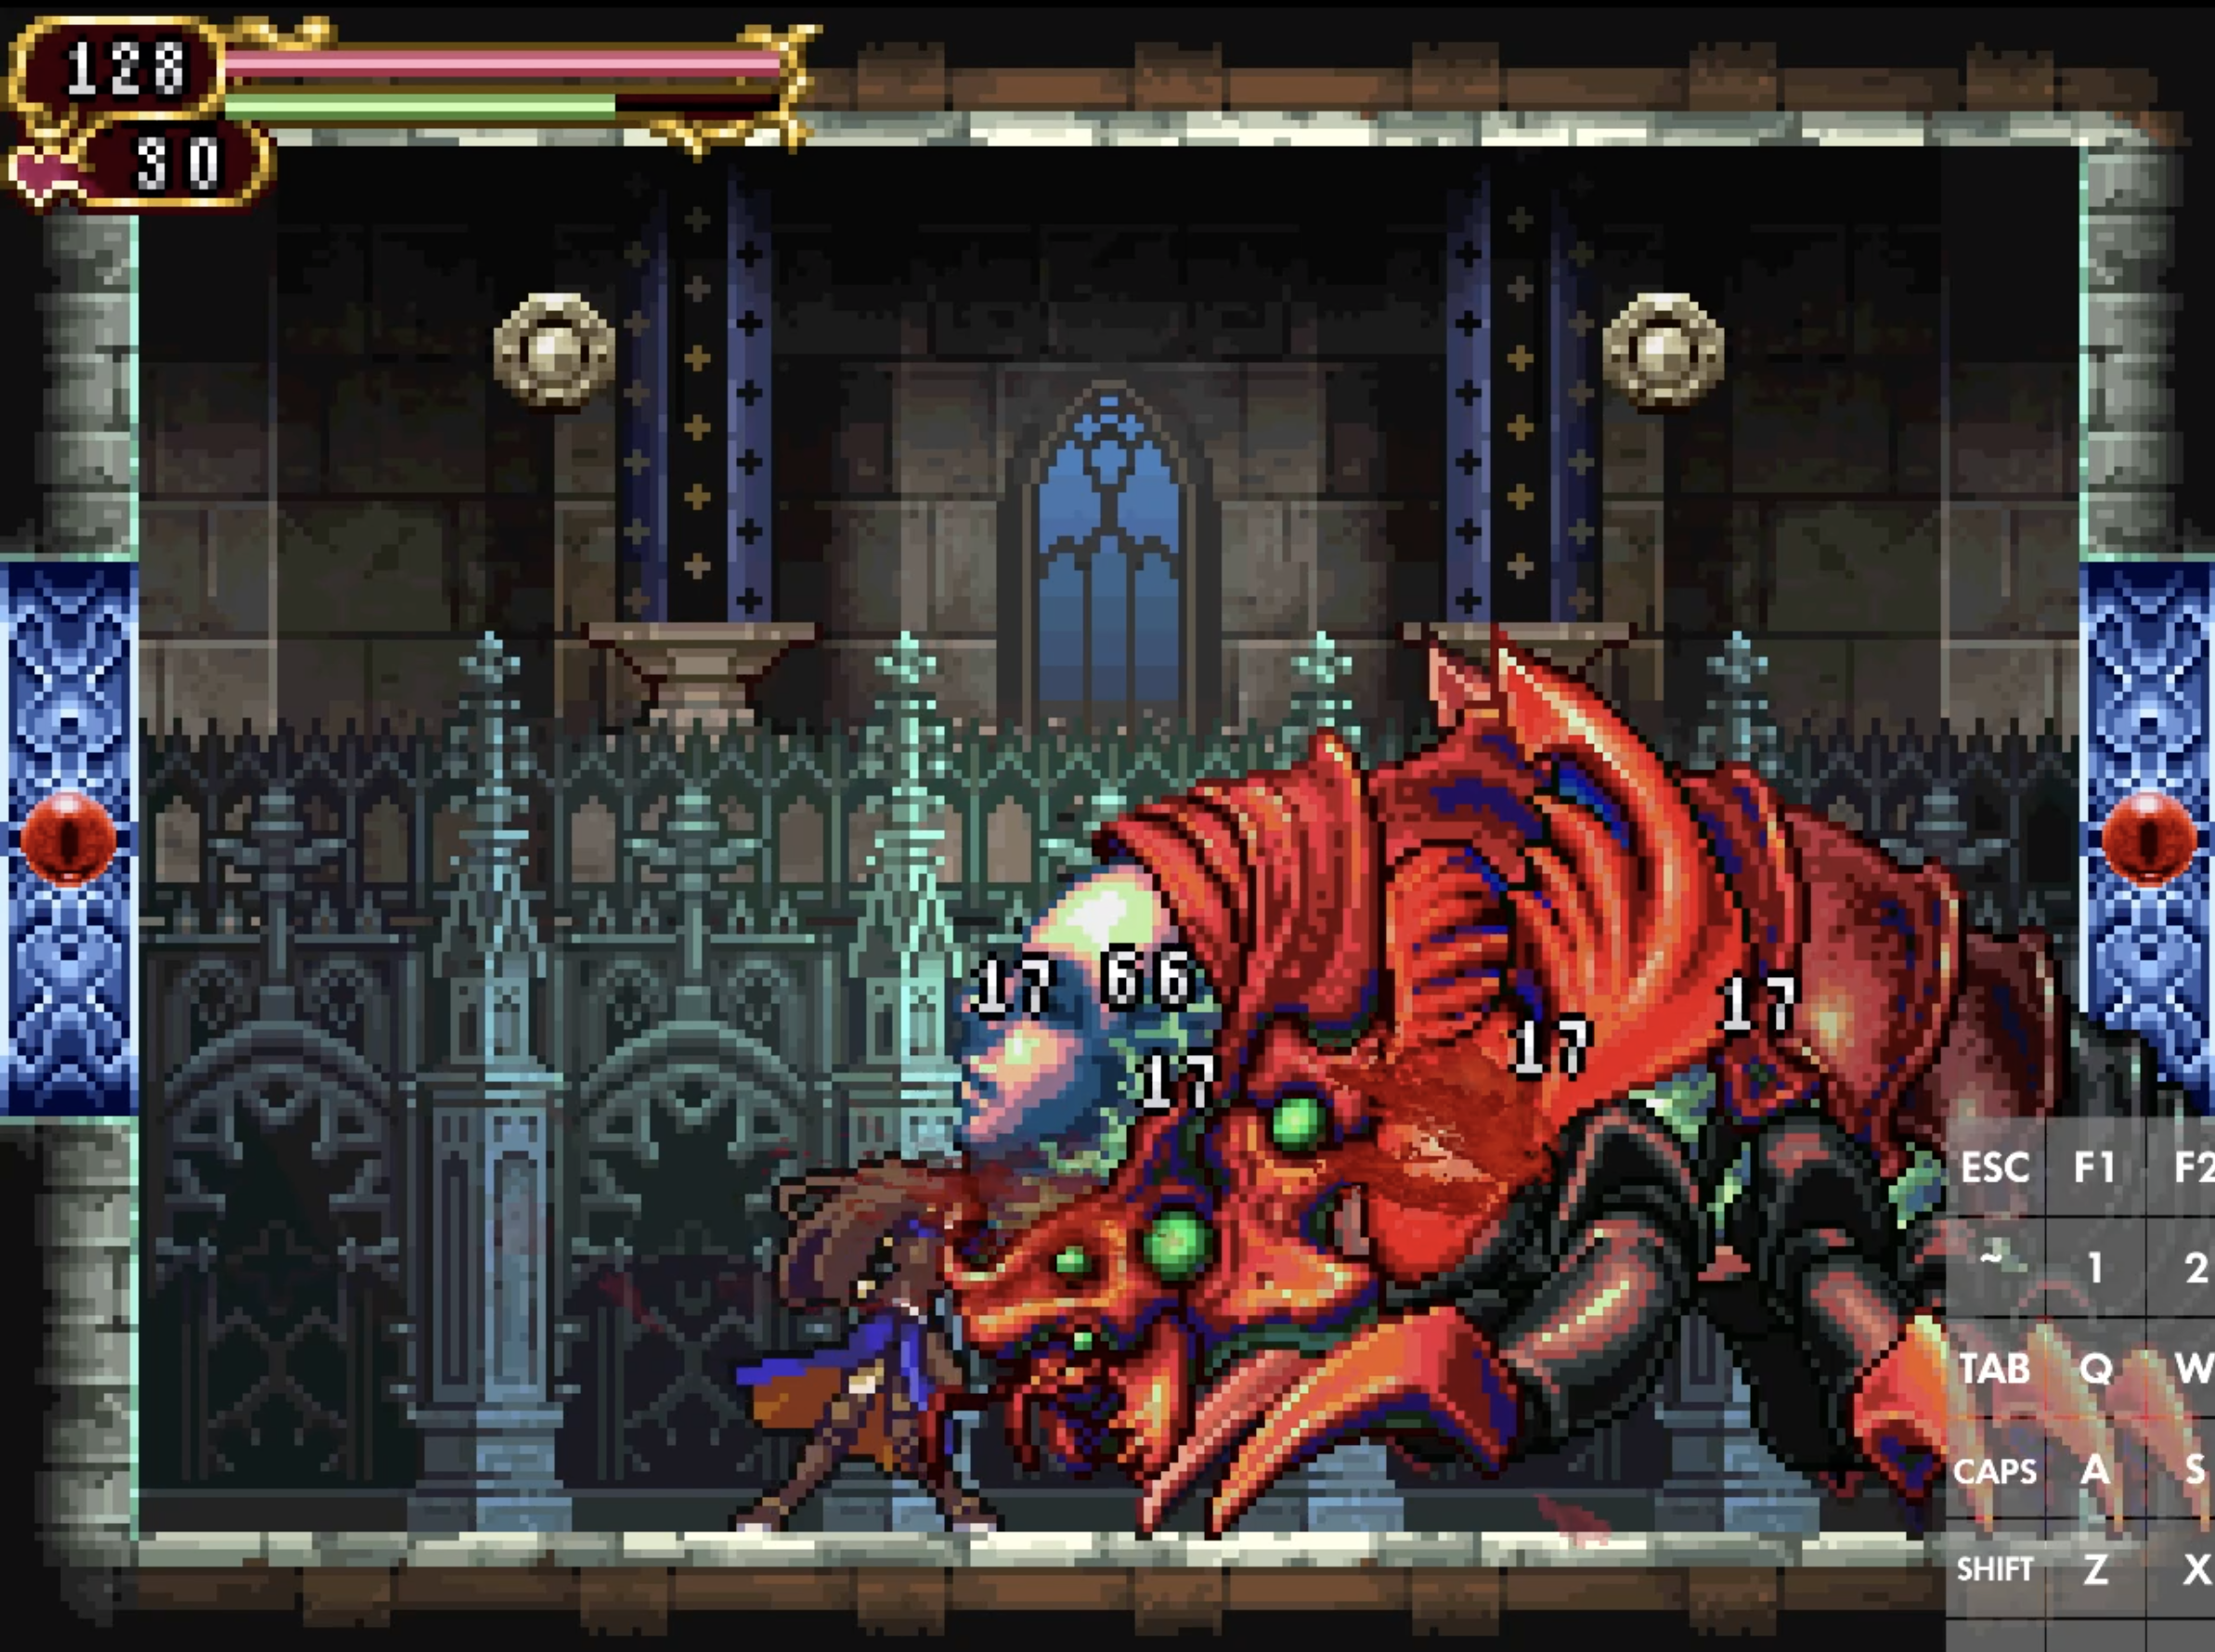
Man-Eater
This one is a bit tricky, but you want to one-shot this with Double Hatred, so switch to that sleeve
The image below shows the general spot you wanna stand at for this
This is crucial, as the tentacles come out, use Double Hatred, it should die before its tentacles fully extend outward
Refer to the video for a clearer visual:
Slide into the portal
Rusalka
I do a jump slash in then a single grounded union
After that, you just do normal attacks till she dies. I try to take advantage of the Hair Spike Manip
This helps kill her in the center of the room, so you can quickly grab the orb and go through the protal
Goliath
Fun fight here, and all credit goes to Smith for these strats
Backdash in, turn around and do Double Hatred into Puff Union twice, avoid an attack if Goliath does one, then do the same attack sequence again once
This is enough damage to make Goliath crouch, allowing you to also crouch at his toes and start spamming Confedere (found by Halgorithm)
Use your High Mind Up after a couple attacks since you'll be out of MP
Keep attacking, when Goliath gets up, stand and use a Confedere Union, make sure his hand is fully extended so it doesn't hit you
Do a couple more attacks, and as he's crouching, use your final union
We want to grab Serpent Scale here then go back to the Elevator Room and through the portal
Go left to grab Double Jump. You can Slide into the Giant Skeleton for i-frames to grab the chest There's also a small area infront of it where you can open the chest but its riskier
Go right and through the portal, and dash to the right exit of Somnus Reef
In the first vertical room, travel on the left side and use your last 5 hearts for a Puff Union on the Decarabia
Use Hatred for the rest of the Decarabias and leave right
Go to Lighthouse and enter through the Bottom Exit and go to the portal
Keep using it until you get to Goliath's Room, then head to the save and save before resetting and loading the Main Save
To Gravedorcus
Pre-Tristis
Leave Giant's Dwelling from the right exit
Go back to the Village to trigger the Cutscene
Skip it, go back to Giant's Dwelling and dash into the next room to trigger the Albus cutscene and grab Dominus Anger
Leave to Tristis Pass
Tristis Pass
You can backdash through the first Arachne here or Dive Kick Over but that's more of a Glitchless strat
Go down like normal, and in the Giant Skeleton room, I recommend doing the same
Grab Vol Grando from the waterfall. I like to Instant Fling to it then back to edge before sliding off
Hold left as you fall down the waterfall then wait a bit before using your double jump to land at the Red Chest to get the Hearts
This heart grab is a bit tricky, definitely watch the runs to see how people do the jump
In the Spike Room, hit the bat then Instant Fling across. There's a TAS strat here, which I will discuss more in Glitchless
In the Ectoplasm room, try to avoid them, you can use Hatred to kill them if needed
The next vertical room, Dive Kick on the right side of the Second Lizard Man, wait till the apex of the kick to Double Jump on the platform
Divekick off the next Lizard Man. If done right, an Altair should spawn perfectly for you to kick off that and ascend efficiently
From there, just dash to the left through any enemies
At the Glyph Statue, reload the room absorb the Vol Hasta I don't recommend grabbing it without reloading since we don't have Tower Ring
Then just dash to the left exit to Oblivion Ridge. Remember to use alternate forms of backdashing when low on MP here
Also, if you get hit by the Ectoplasms, it's not a big deal. Just keep ascending and ignore the save since the Curse debuff wears off at the top anyway
Oblivion Ridge
Damage Boost through the first room. You may have to watch your MP here
Take the save heal, dash to the boss room
The Gravedorcus Quick Kill
There's multiple ways to do this, but I'll outline how I do it
Briefly wait to trigger Grave's Jump Attack, then slide off the right
Do a Double Hatred Cast when he's above you, and wait for him to surface to the right
As he surfaces, use a Puff Union -> Double Hatred Cast -> Backdash
You want to do this quick since being this close to him will trigger his Poison Breath if you don't get away fast enough
During the backdash, Go to Equipment Menu -> Macir Sleeve -> Replace 1 Macir with Vol Grando -> Exit Menu
Quickly, Grando + Macir Union Cancel until 0 Hearts, crouch infront of him as he digs, then Double Hatred Cast
Other runners do this slightly different, so try them out and do what works for you
If Gravedorcus surfaces left of you after the start, you can do the same thing but you need to adjust your positioning so that the Union doesn't ghost hit
If you fail the end of this, it's not a big deal, he should be 2-4 regular hits away from death
Exiting Oblivion Ridge
You can Dive Kick over the plant or dash through it, then continue left and Damage Boost through
Enter the room -> skip the cutscenes -> Magical Ticket out
Head to Ecclesia scale up as you did at the start of the game and trigger the Barlowe Cutscene by entering his room
Regenerate your hearts and heal if needed, most likely needed unless u want to go slow in Manor
Make you way back to Albus' Boss Room -> Skip the Cutscene -> Ticket Out -> Go to Barlowe's Room -> Equip All Three Dominus Pieces then Union to trigger Bad Ending
Skip the cutscene then watch the Bad Ending
Albus Fight Two
Requip Double Anger then dash into the room and to Albus and do the Triple Anger Casts -> Puff Union
Dash behind him again as he runs away, do a Hasta Union then start finishing him off with regular Vol Hasta hits
If he jumps away, follow him to keep up the damage
You can also bait his Flame Kicks to him in place
Make sure you're above 75 Hearts after absorbing Agony
Dash to the save Equipment Menu -> Replace Vol Grando with Nitesco and add Dominus Agony -> Replace Double Hasta with Nitesco and add Arma Felix -> Save -> Reset
Go to Course 2, you should now be Albus
Blackmore
Go through the portal
A quirk with this glitched state is we can use Felix by pressing X and Nitesco with R, buttons might be different depending on controller Primary Attack = Felix, Back Glyph = Nitesco
Jump in -> Optical Shot -> Nitesco -> Land -> Flame Kick Right and Get Hit -> Optical Shot -> Nitesco -> Go Under During Phase Transtion -> Neutral Flame Kick
Try for this sequence of attacks and adapt based on his pattern, ideally he should not slam or lunge forward
The fight shouldn't be longer than 15 seconds, ideally under 10
Do not go below 90 Hearts
Eligor
High jump -> Teleport onto His Back -> Press X to transform into Felix -> Untransform to become Shanoa
Heal to 400 HP or Greater -> Start Killing Death with Regular Nitesco Lasers + Agony -> When Dead Replace Agony with Magnes -> Magical Ticket Glitch out
You currently have Moonwalkers equipped, so use that to backdash through any unavoidable attacks like his Scythe Trap
If you got a Heart Refresh at the start of the game, use it after those first 2 Unions during the heal menu, then use the extra hearts for Unions
To Volaticus
Take the heal at Village -> Go to Castle -> Warp to Forsaken Cloister's Entrance
With Moonwalkers our Magnes Dashes will be faster and have i-frames, so use it to dash through enemies till the Cerberus Gate
The Boss Rush glitch opened the gate for us, so we can just ascend it. Make sure to grab the Eisbein at the top
Enter Final Approach, since we're still in boss rush we can take a lot more hits on our way to Volaticus so be liberal with the Damage Boosts
Kill Imps if they're in you're way as their debuff will cost you a lot of time, use Nitesco on the Ruler Swords to not get hit
In the second room, you can sometimes divekick off the Imps then kick the Lizardman to get over them, otherwise boost off the Imps
Continue left by sliding under the Cave Troll, dive kicking over the Succubus, and boosting through Final Knights
Fall down to Volaticus, absorb it, and equip it on your Double Hasta Page. I tend to heal here too
To Dracula
Fly up to the ceiling room, use double Hasta to kill the Bugbears and grab the Heart Max Up in the rightmost Red Chest
Leave and fly right to the double Final Knight room and dash through them again.
In the Cavetroll room, slide under the first one, turn around and Nitesco + Macir Union to kill two of them
One the second level of this room, do a Jump Union to kill the next 2 above you and freely dash to the next room
Boost through the Devil and Final Knights, use Unions to kill the 2 Devils before the big room
Grab Judgment Ring in the breakable wall to the right in the final big room, then make your way left while killing the Devil with your last few hearts
Grab the Heart Max Up -> divekick off the Bugbear -> Dash through the Devil and Skeleton Blaze then fly up to the save before Dracula
If you need to kill the enemies after the Heart Max Up, use normal Double Nitesco attacks
Finally, save before Dracula and reset to load the main save
Dracula
On the Double Nitesco equip page, equip Dominus Agony
Equip all three Dominus Pieces on the Volaticus page then equip Strength Ring and Judgement Ring